
How to Create a Free Waworks Account and Connect WhatsApp Business

Create your Waworks account, connect your WhatsApp Business number, and get your business ready for smarter WhatsApp communication.
In this guide: Click a question to jump straight to its answer.
- What do you need to create a Waworks account?
- How to create a FREE Waworks account?
- How to log in to your Waworks account?
- How to connect your WhatsApp Business number to Waworks?
- How to add your payment method on Meta?
- What are the most common questions about Waworks setup?
Want to manage every customer conversation in one place? Getting started with Waworks takes just a few minutes. Start your 14-day free trial with no credit card at signup, connect your WhatsApp Business number through Meta, and you’re ready to go. Here’s the whole journey, one screen at a time.
What do you need to create a Waworks account?
Keep these handy so setup goes smoothly:
- Work email to receive your OTP
- WhatsApp Business number that can receive a verification code
- Business details: legal name, country, website and team size
- Facebook account with admin access to your Meta Business portfolio
- Card or UPI for Meta billing later (not needed to sign up)
Good to know: Meta may ask you to verify your business before you can start sending messages.
How to create a FREE Waworks account?
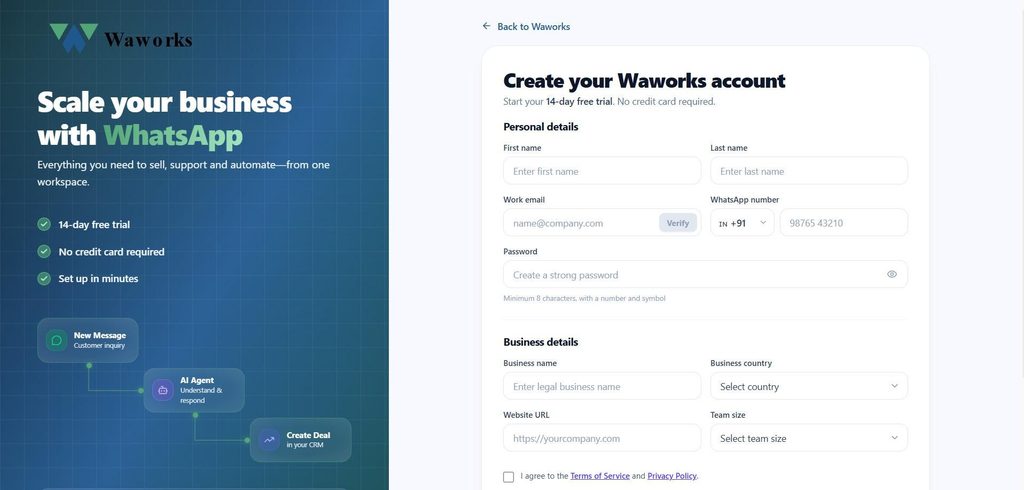
Step 1 Start your free trial
Open the Waworks signup page and start your free trial. Enter your name and work email, then hit Verify.
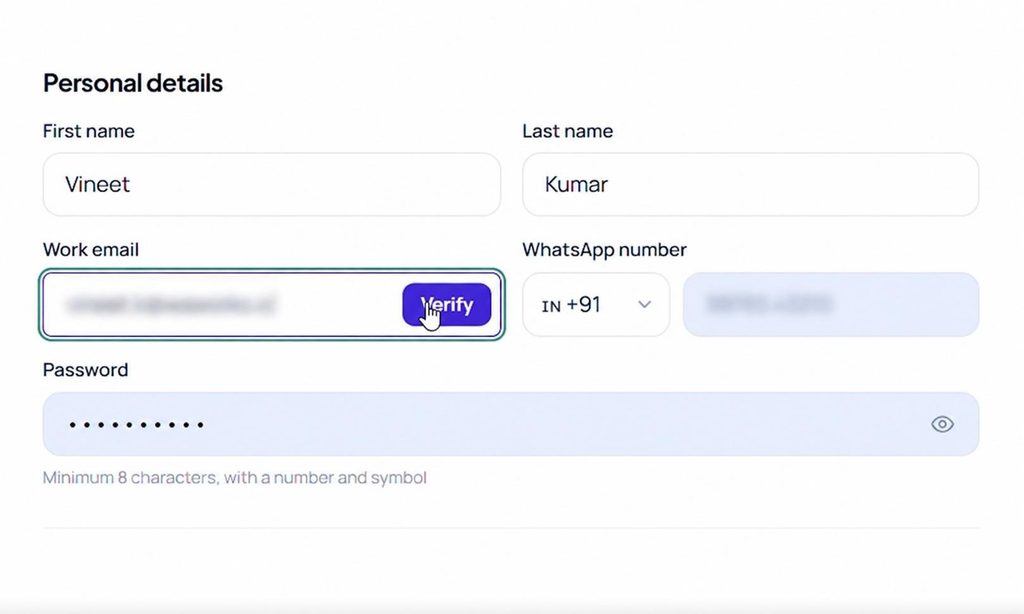
Step 2 Verify with a quick OTP
Waworks sends a 6-digit code to your email. Enter it and click Submit, then add your WhatsApp number and a password (8+ characters, with a number and a symbol).
No code yet? Wait for the timer, click Resend OTP, and check your spam folder.
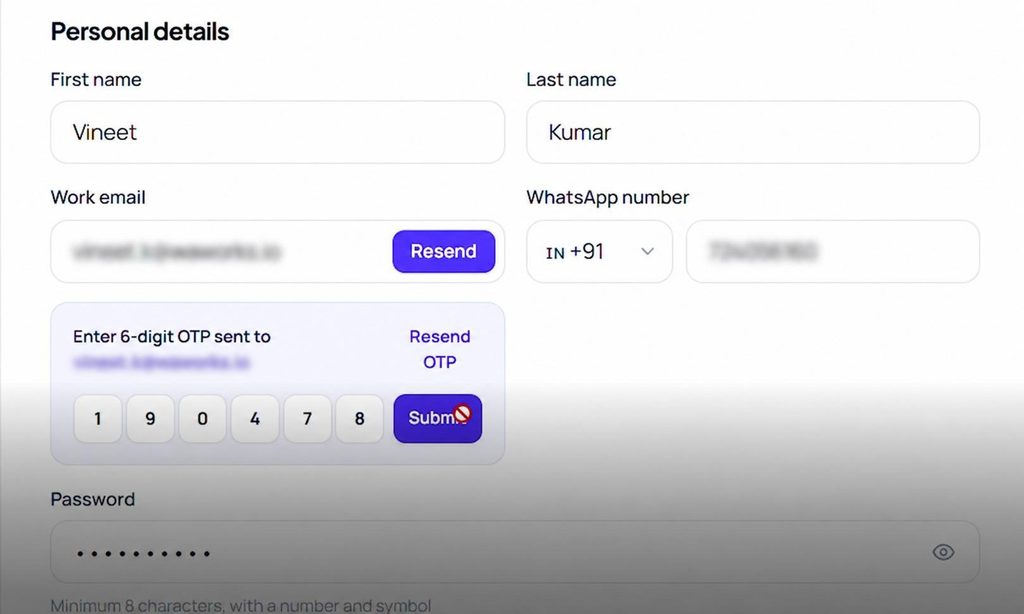
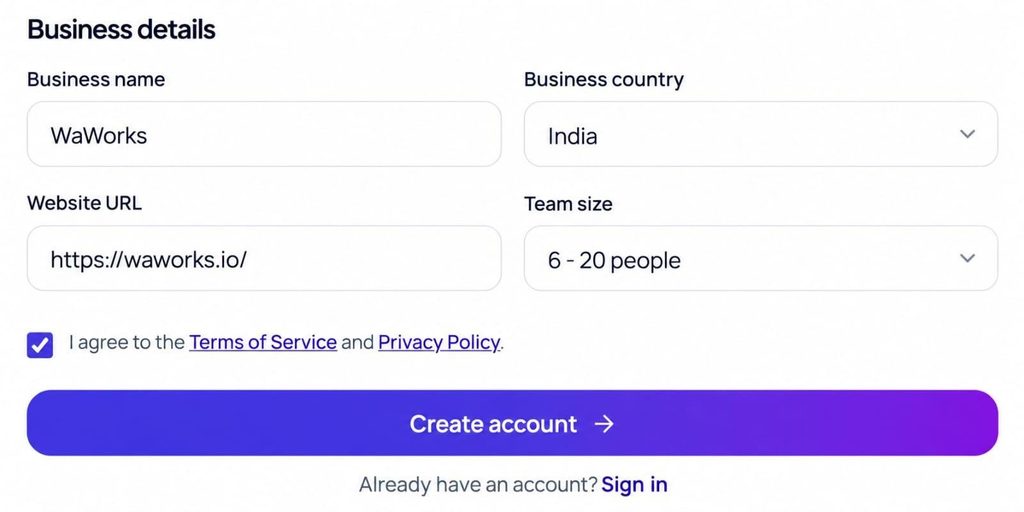
Step 3 Tell us about your business –
Add your legal business name, the country where it’s registered, your website and team size. Accept the Terms of Service and Privacy Policy, then click Create account.
How to log in to your Waworks account?
Step 4 You’re in!
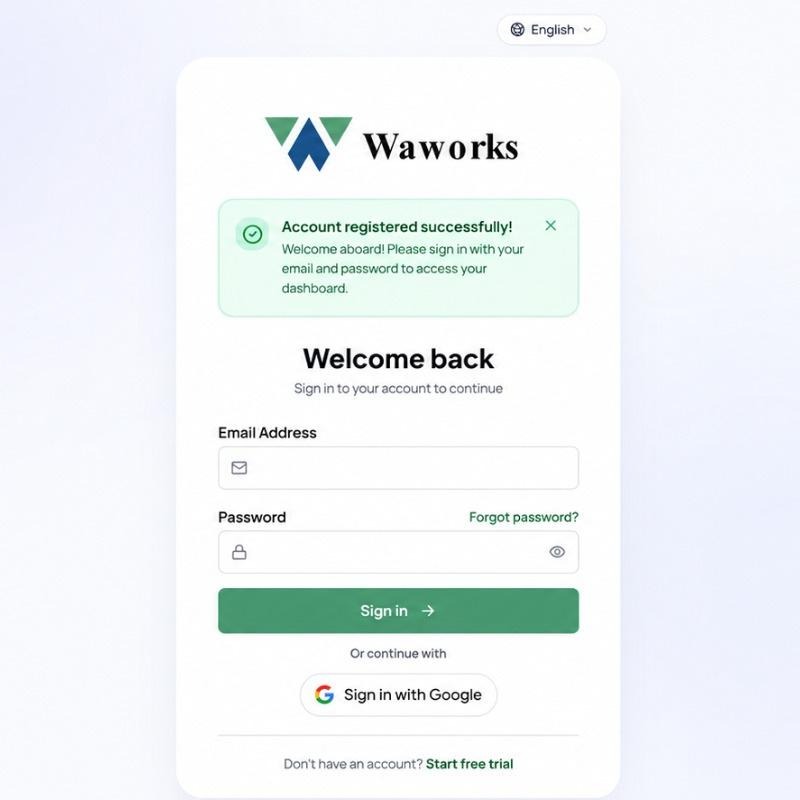
You’ll see Account registered successfully! on the login page. Sign in with your email and password and you’ll land on your dashboard, your home for the inbox, contacts, broadcasts, templates and more.
How to connect your WhatsApp Business number to Waworks?
Step 5 Start the connection
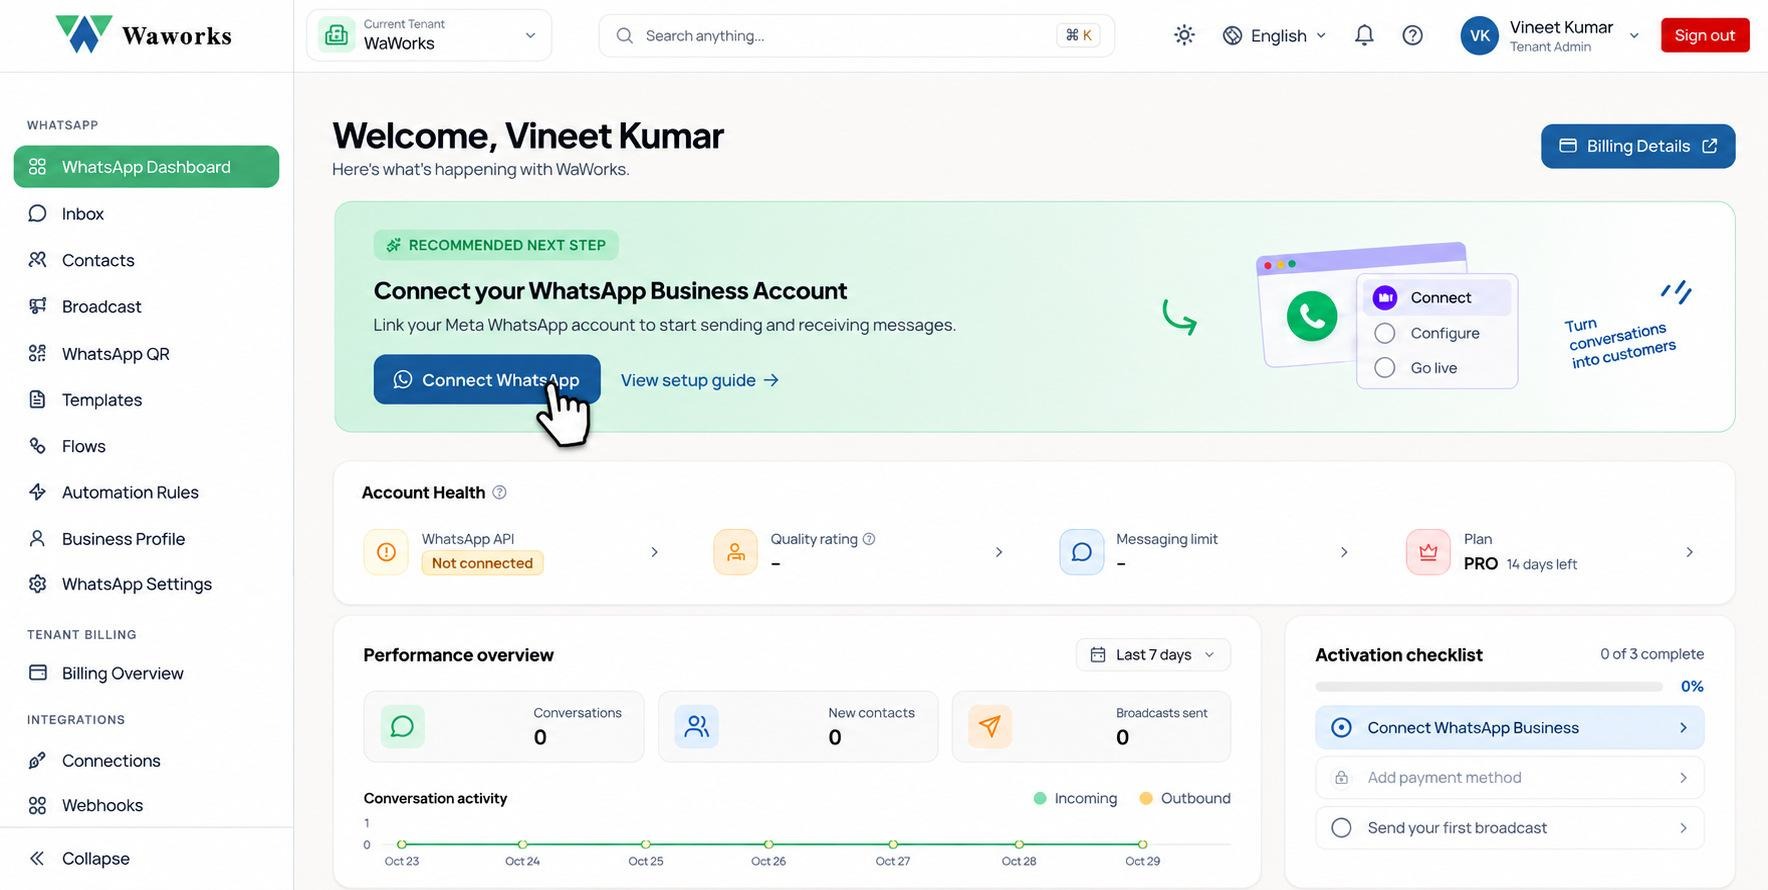
Click Connect WhatsApp on the Recommended next step card (or open WhatsApp Settings), then choose Connect with Meta. It’s the recommended route. Keep Manual Setup as a last resort, only if the normal connection fails or shows an error.
Step 6 Choose how you want to use WhatsApp
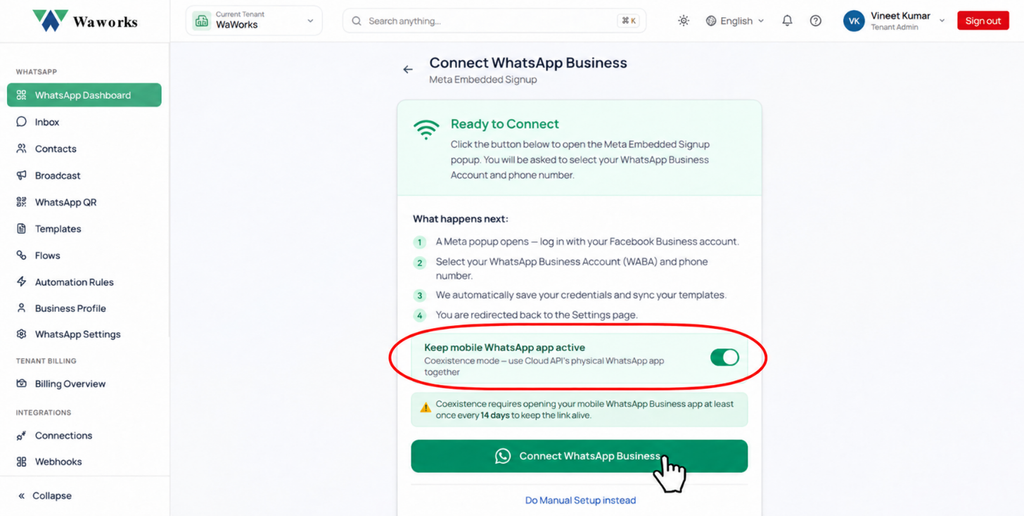
Switch on Keep mobile WhatsApp app active to use WhatsApp Business on your phone alongside Waworks. Simply open the app once every 14 days to stay connected.
Coexistence is exclusive to the PRO plan. Upgrade to PRO for the flexibility of managing WhatsApp from both your phone and Waworks. Otherwise, WhatsApp will work through Waworks only.
Then click Connect WhatsApp Business.
Step 7 Continue with Meta
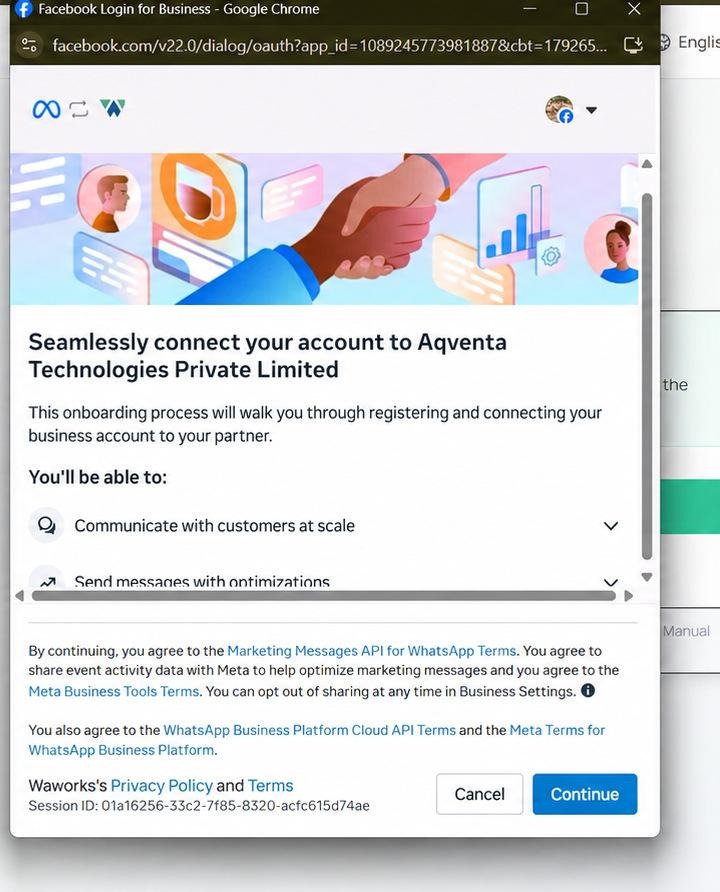
A Meta window opens. Log in to Facebook if asked, then click Continue. Spot Aqventa Technologies Private Limited? That’s the parent company of Waworks, so everything is as it should be.
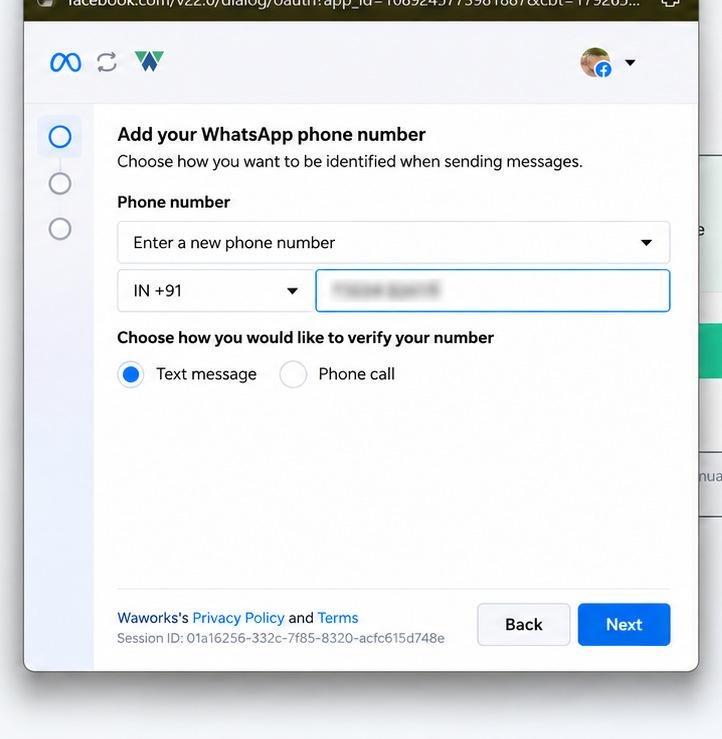
Step 8 Add your WhatsApp Business number
Enter your number (or pick one from the list), choose Text message or Phone call to get your code, then click Next.
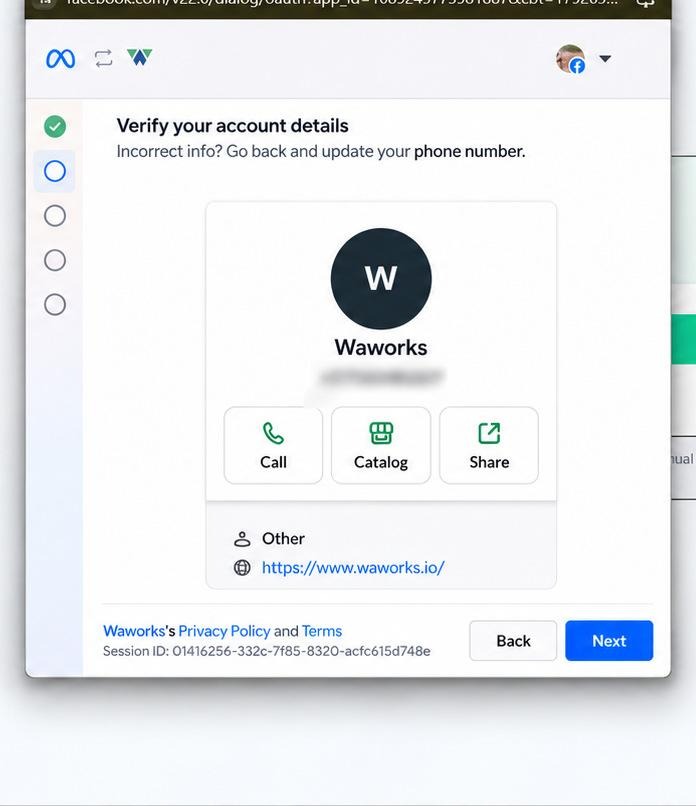
Step 9 Check your business profile
Meta shows the profile linked to your number. Check the name, number and website. Click Back to fix anything, or Next to continue.
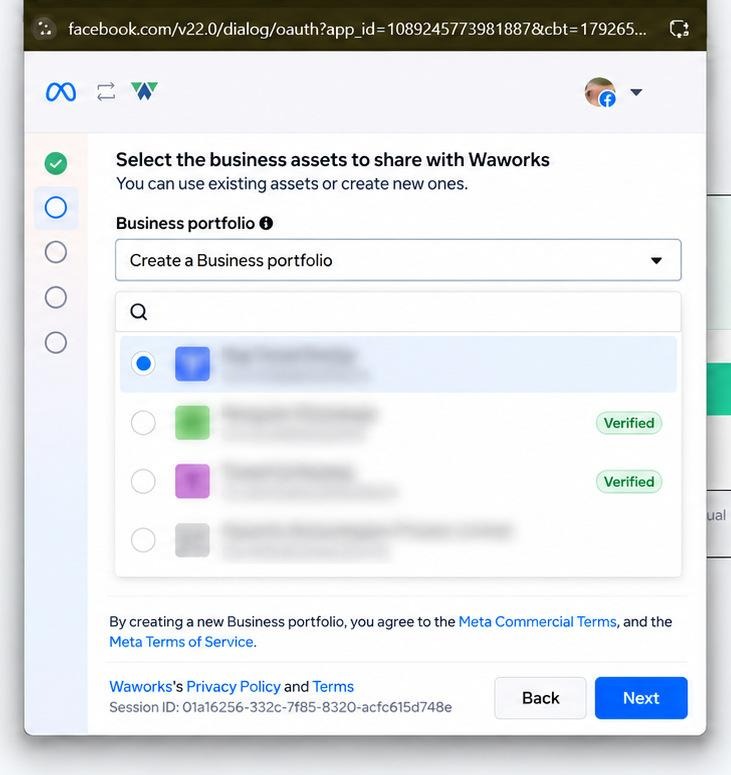
Step 10 Choose your business portfolio
Pick your Business portfolio from the dropdown, or create a new one, then click Next.
Step 11 Import contacts and chat history
Only if the mobile app option is on. Otherwise, skip to the next step.
On your phone, open WhatsApp Business and tap Connect on the message from the official Facebook Business Account (can’t see it? Go to Menu or Settings > Account > Business Platform). Choose whether to share your chat history, then scan the QR code on your screen.
Prefer a code? Click Use an access code instead, copy it and enter it in the app. Click Next when you’re done.
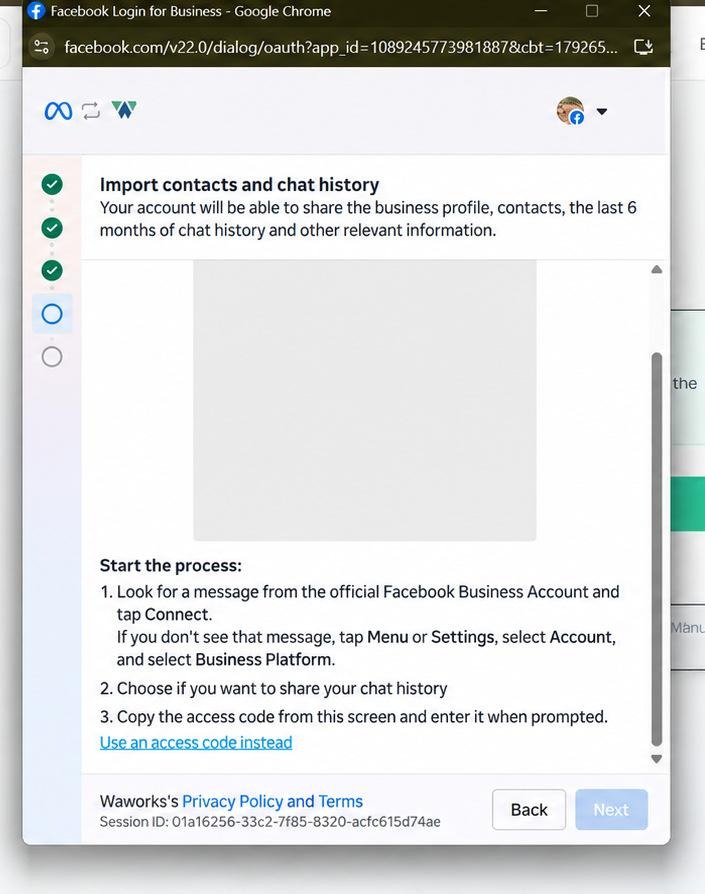
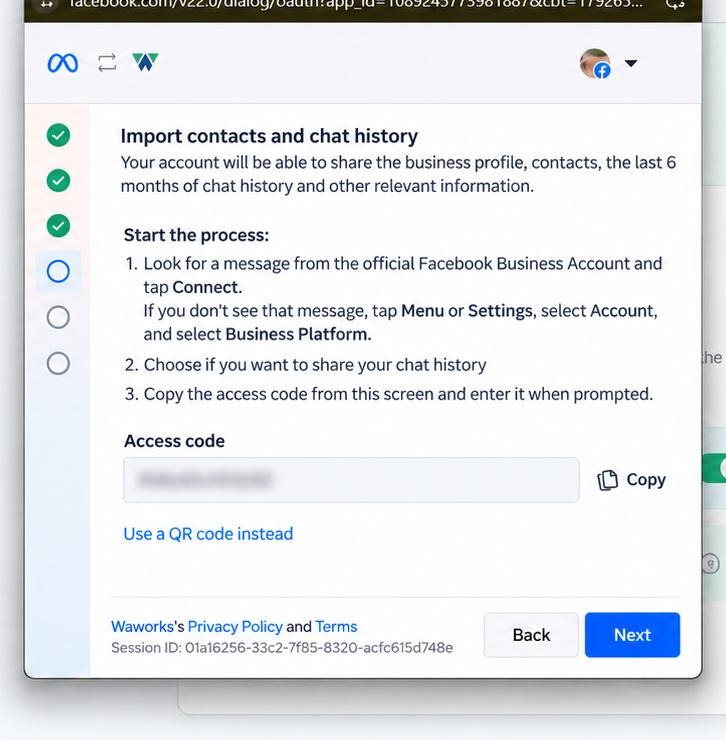
Step 12 Confirm your account name
Check your WhatsApp Business account name and time zone, then click Next.
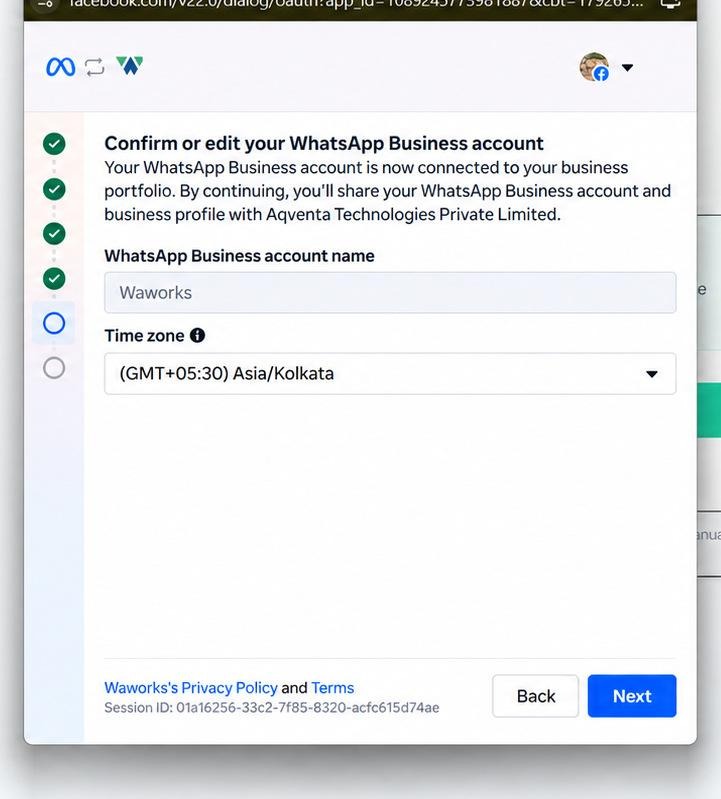
Step 13 Review and Confirm
See what Waworks will be able to access, your WhatsApp accounts and conversations, then click Confirm. Meta connects your account in a few seconds.
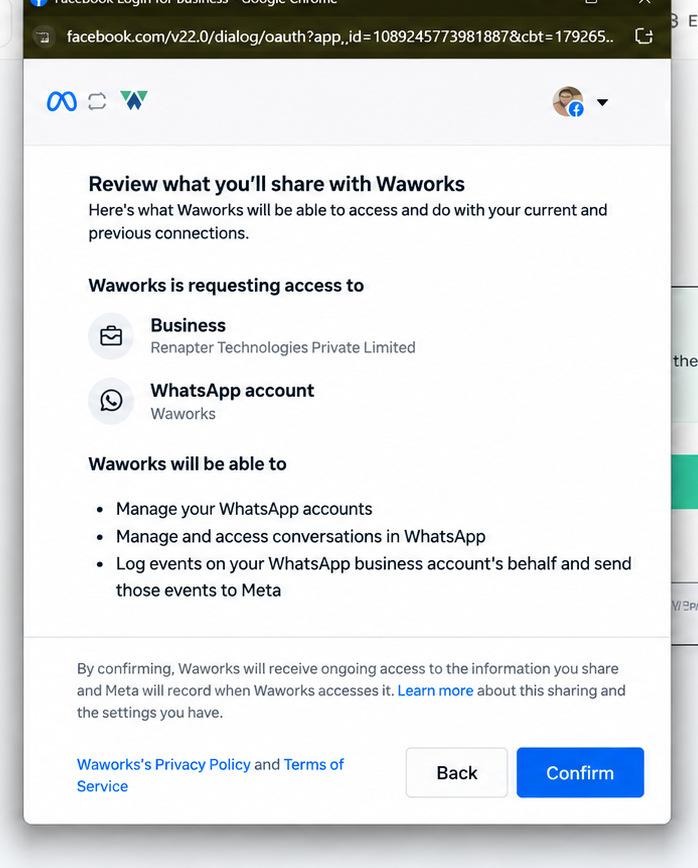
Step 14 Enter the confirmation code
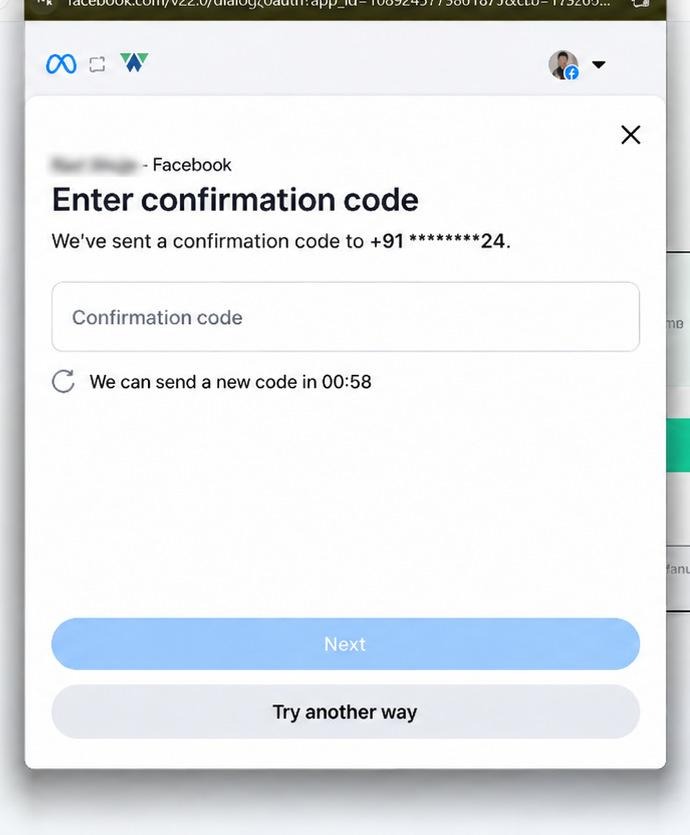
Meta sends a code to your WhatsApp Business number. Enter it and click Next. Didn’t arrive? Wait for the timer to end and ask for a new one, or click Try another way.
Step 15 Click Finish
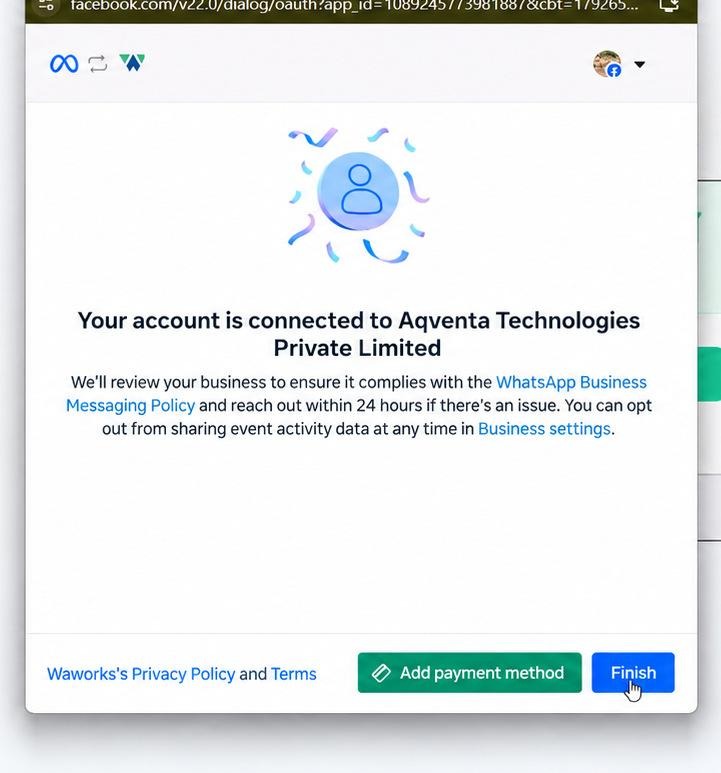
When you see Your account is connected, click Finish. Waworks confirms with WhatsApp Connected! and takes you to Dashboard. Meta also reviews your business against its messaging policy and gets in touch within 24 hours if there’s an issue.
Step 16 Check your connection – Double check your connection from settings once
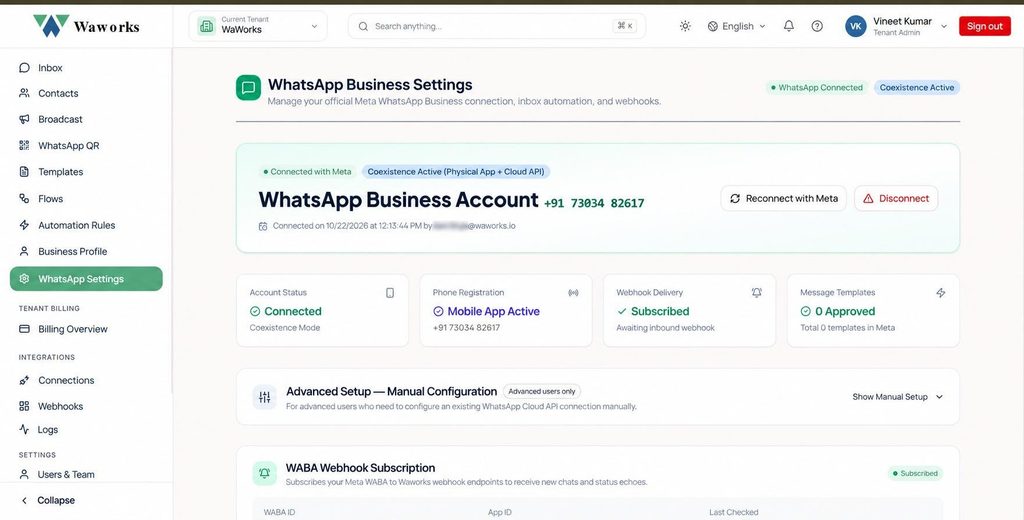
On WhatsApp Settings, look for WhatsApp Connected and Coexistence Active. Your four status cards should read:
- Account Status: Connected
- Phone Registration: Mobile App Active
- Webhook Delivery: Subscribed
- Message Templates: your approved template count
waworks
Passionate about conversational AI, customer communication, and unlocking high-converting messaging workflows with WhatsApp automation.